Thursday, December 27, 2012

Christmas Chocolate Tart

Now that Christmas is over, I'm believe I'll be heading in a tad bit healthier direction with my recipes...While my recipes wouldn't be described as "fatty" or unhealthy, I think I can step it up a bit in the nutrition department. That means: less carbohydrates, less white flour, and less refined sugar. It's a brave new world, and I'm jumping in! While this next recipe doesn't exactly jive with the whole paleo/green/crazyfit new me, it is simple, delicious, and you'll only want a sliver of this dark chocolate tart. Plus, my mother made it on Christmas, so it goes without saying that it'll be a hit.


If you look closely enough, you'll see Ben & Jerry's Greek Frozen Yogurt. If you think that Blueberry Graham Cracker Frozen Yogurt doesn't mix with chocolate tarts, you'd be wrong. 


Ingredients: 

crust- 
8oz. gingersnaps, finely crushed (Anna's brand is the best)
1/4 cup melted butter 

filling-
12oz. bittersweet or dark chocolate, chopped finely
1 cup whipping cream
1 egg and 2 yolks
1/2 cup sugar
1tsp.flour
pinch salt

Method:

Preheat oven to 325 degrees.   Crush the gingersnaps very finely, placing them in a plastic bag and rolling over them with a rolling pin does the trick. Next, add the melted butter and press crust mixture into greased tart pan, set aside. Combine chocolate and cream in saucepan and whisk on low heat until melted. Whisk egg yolks, egg, sugar, and flour in a separate bowl. Gradually whisk chocolate mix into egg mix and blend. Pour filling into crust. Bake 30 minutes until center is softly set. Allow to cool (if you can) and drizzle with some homemade caramel sauce (not diet friendly- but it's the holidays!!) I made this recipe here to go with my Christmas Eve Turtle Cheesecake. Now here's to good, healthy, resolutions and goals in 2013!


Sunday, December 16, 2012


Whole Wheat Chocolate Minicakes with Cream Cheese Glaze and Candied Ginger

Whew! That's a long title, isn't it? I couldn't think of a better way to represent my little Christmas treats, so I thought I'd pack as many words into the title as I could. Why the name "minicakes"? Well, it's a lot cuter sounding than cupcakes (boring!) and I find it hard calling them cupcakes when: they're not that sweet, they're healthy, and you won't get cavities from eating one. I made these a week or so ago, but life has been a bit busy, so I hadn't had time to post pictures. They're little bites of joy, little flavor filled treats. I personally love eating big chunks of candied ginger solo, but I understand the flavor can be strong for some. I used only one giant bowl for these (washing before the glaze!). While the finesse may not be there, the flavor certainly is!


Mmmmm, don't they just look Christmas-y? I've been drinking a lot of hot cocoa recently, and I can tell you that these babycakes are divine with a steaming cup.


Ingredients:

Minicakes-

4 oz. dark chocolate (70% or more cacao) or half a bag of dark or semi sweet chocolate baking chips
3 tbsp. coconut oil
3 tbsp. agave nectar
1 1/2 c. whole wheat pastry flour
2 eggs
1 tbsp. powdered ginger
1 tsp. baking powder
1 pinch of salt
1 pinch of cinnamon

Glaze-

1/2 c. cream cheese, softened to room temperature
3 tbsp. powdered sugar
2 tsp. milk

Topping-

candied ginger, found near the dried fruit in your grocery store

Method:

Preheat oven to 375. In a large saucepan, melt the coconut oil and chocolate over medium-low heat. When mixture is almost completely melted, remove from heat and stir until completely combined. Pour chocolate/coconut oil mixture into a large mixing bowl and add your remaining ingredients, reserving the flour last. If mixture is too dry, add a tsp. or so of soy, almond, or non-fat milk.


Now, grab your muffin tin, grease with some butter or oil, and then fill each about 3/4. Bake for about 20-25 minutes, keeping your eye on those minicakes. Let cool for about an hour, then mix up your glaze. My cream cheese was soft enough that I could just whisk it, rather than breaking out the Kitchenaid. I like the idea of a light glaze on these, because I want to taste the combination of chocolate and ginger and not be overpowered by a frosting. I drizzled my glaze lightly just on top. Finish with two or three small pieces of candied ginger and take a big bite!


Only NINE more days 'til Christmas! I already found my Christmas Dessert that I'll be making... and the appetizer, too!

Saturday, December 15, 2012

Monday, December 10, 2012

Healthy Holiday Snacking

Believe me, I know as well as anybody how tempting holiday treats can be. Just set foot in a Trader Joe's and you'll see Peppermint-Chocolate-Covered This and Hazelnut -White Chocolate Dipped That. It's hard, my friends, it's hard. However, when you are ever so tempted, just whip up some homemade cheez its and some  pear-apple sauce (made entirely of pears!) With our schedule getting a little tighter due to new jobs, attempting to run outside most days, Christmas shopping, and planning Christmas Eve dishes, we've been trying to be mindful of what we're putting in our bodies. These treats, although not made of quinoa and flaxseed, are free of artificial ingredients and colors. You may even find the ingredients in your pantry right now!


Although I'd like to take credit for this ingenious recipe, I borrowed these yummy, bite sized cheese snacks from A Chow Life, an amazing blog. These do not take very long to make and they'll keep you satisfied when you're running around, shopping, or picking out your Christmas tree.


Next, a perfect compliment for your snacking, pear (apple) sauce. I would just call it "pear sauce", but that sounds pretty strange and unappetizing. At least to me, so bear with me.


Ingredients:

3-4 soft Bosc pears, I'm sure you can use other varieties, but these are my favorite.
1 tbsp. cinnamon
3 tbsp. c. brown sugar
1 pinch of salt
1 tsp. nutmeg
1 tsp. ginger
1 tbsp. light corn syrup
2 tbsp. warm water

Method:

This recipe is so easy you could do it while poring over the awe inspiring Nigella Lawson book, How to Be a Domestic Goddess. I am so specific, because that is precisely what I was doing while making this pear sauce. 


Simply roughly cut up your pre-skinned pears and pile them in a large sauce pan, then add 2 tbsp. warm water. Bring to a simmer slowly, then add the remainder of your ingredients, in no particular order. You may want to use less brown sugar, since the pears are generally very sweet, but it's up to you. Cover pan and allow to simmer for about 15 minutes, checking frequently. Then bring heat down to a low and let sit covered for about 30 minutes.

Let cool before serving, burned tongues would not be fun. Serve to your loved ones, or have it in front of a crackling fire. Either way, know that something warm, healthy, and delicious is about to nourish your holiday addled mind!

Tuesday, December 4, 2012

Ballard Pizza Company

My super great brother in law came to Seattle today for meetings, and we ventured out into the wet, damp, night to Ballard Pizza Company. We had been there before Thanksgiving but got a half and half pie this time! It was delicious; one side was the classic Margherita, the other was the Ballard Bridge, with Italian Sausage and specialty pepperoni. After a long day of work at my new job, I welcomed the chance to sit down and eat good food with good people. Ballard Pizza Company did not disappoint!


picture courtesy of Ballard Pizza Co.

Sunday, December 2, 2012

Christmas Cranberry Bread Pudding


Mmmmm, bread pudding. I recently fell in love with the stuff when we frequented one of our favorite pubs after a long day of moving, and I rewarded myself with some apple bourbon bread pudding. Divine. Little did I know, that there is also savory bread pudding, which I happened to get at the Kingfish Cafe when friends were in town. Bread pudding: so many possibilities, so little time.

Even though we are working on limiting our carbohydrate intake, along with red meat, sodium, blah blah, I think this is worth taking a little time off from your regimen. Plus, the weather has been 'decent' here recently, so I've been running it off, I hope! This recipe came straight from the depths of my brain. I had some leftover cranberry walnut bread from Trader Joe's that we had at Thanksgiving, as well as some crusty whole grain stuff, so I thought why not. The result is pure happiness. I hope you agree.


Ingredients:

About 3 cups of crusty, roughly chopped, preferably day old bread, (whole grain or sweeter bread is good with the tart cranberries)
1/2 c. granulated sugar
1 c. heavy cream, 1/2 c. Pumpkin Spice Silk Soy Milk
3 eggs
1 1/2 c. fresh cranberries
1/2 c. dried cranberries
1/2 c. walnuts, chopped
1 tsp. ground cinnamon
1 tsp. ground nutmeg
1/2 tsp. ground ginger


Method:

Preheat oven to 350 degrees. Then, butter a pie pan lightly, making sure to include the edges. Dust flour over surface of pie pan. In a separate bowl, mix cream, soy milk, and spices together. In the pie pan, spread around the chopped bread pieces, making sure all surfaces are filled. Then, evenly sprinkle granulated sugar and cranberries over the bread. Pour your cream/soy milk/spice mixture and cover the bread and berries evenly. Let soak for about an hour in the refrigerator. Then place in the oven for about 35-40 minutes, checking at 30 minutes, and removing from heat when edges are golden brown. Just to be sure, jostle the pan a bit and make sure that the pudding is one mass, rather than the liquid separating from the bread- if the bread has been soaked properly this should not occur. Let cool for about 5-10 minutes and enjoy with a scoop of ice cream or some tea! It's perfect for a Christmas Morning breakfast.


In other news, this is my SIXTIETH blog post! I can hardly believe it. This blog has been super fun to have and I feel very creative with it. Photography and cooking is such a good outlet for me, and I love sharing my thoughts on it. Hope you are all getting in the holiday spirit! We put our Christmas tree up yesterday and it brings such cheery warmth to my heart. Just like this bread pudding does!

Friday, November 30, 2012

Happy Friday!

Can you believe December starts tomorrow?! You know what that means... Getting a Christmas Tree, Hot Cocoa with Peppermint Schnapps, Baking, Christmas Movies and General Cheer. I don't know about you, but I'm feel pretty blessed this Christmas Season, and am trying to remember my blessings ever day!


Photo from WeHeartIt

Tuesday, November 27, 2012

bitterroot

We went here for dinner tonight! So wonderful, so delectable, so relaxing!

(picture courtesy of Seattle Magazine press)

We shared the pulled pork & mac n cheese with roasted red peppers; for extra good girl points, I even had an entire ramekin of brown sugar squash to myself.

Next time, it's happy hour at Bitterroot... Just take a look at their HH menu!

Ciao,

K

Monday, November 26, 2012

Clean Eating: Mom's Apple Pie


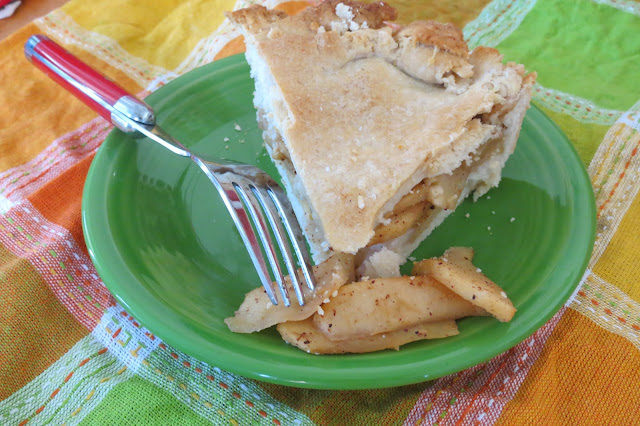
For years now I've enjoyed my Mom's Apple Pie. The crust: flaky, thick, and warm. The apples: spicy and naturally sweet. Last night I had a strong hankering for this pie and decided to whip it up in my own kitchen.


I have so many memories of slicing the apples, sprinkling them with cinnamon, nutmeg, ginger, and allspice, and then being unable to resist eating them straight out of the mixing bowl. The nice thing about this pie is that it contains no butter, no sugar, and nothing artificial. That's right, no sugar. The sweetness of your apples should do the trick. 


And while it's no Martha Stewart apple pie, it certainly is better for your waistline. I am happy to say that with the Clean Eating rage, it's nice to know that my mother had been feeding us "clean" apple pie for our whole lives! Way ahead of our time. 


Ingredients:
2 2/3 cups  flour
3/4 cup vegetable oil or 3/4 cup canola oil
4 tablespoons cold water
4-5 medium sized Pink Lady or Gala apples; or 3-4 large apples; sliced thinly
1 tbsp. cinnamon
1 tsp. nutmeg
1 tsp. allspice
1 tsp. ground ginger


Method: adapted from Mom's crust recipe and Food.com

Measure flour and salt into bowl. Add oil; mix with a fork, until particles are the size of small peas. Sprinkle with water, 1 tablespoon at a time, until flour is moistened and dough almost cleans the sides of the bowl. 


Depending on whether your dough seems to dry or wet, add either a tbsp. of oil or flour. Pick dough up and ball it together into one pressed ball.  Work the dough in your hands to make it a bit less crumbly.

Break dough in half and similar to rolling pizza dough, press it flat between two sheets of wax paper. Roll out into the general circumference and shape of your pie pan. Gently peel off one sheet of wax paper and turn dough upside down. Peel off remaining sheet of wax paper after placing bottom crust into pan leaving a 1/2 inch overlap around pan edge. Follow the above steps with top crust rolling out same as bottom crust leaving 1 inch overhang around pan edge). Fold and roll top edge over pie pan and press edges together with a fork.


Once your apples are sliced, throw them in a large mixing bowl. Add spices and stir well. Allow apples to sit at room temperature for about 3 hours, to macerate in their own juices.  Pour  apples into crust, then fold the pie dough for the top over pie pan, roll top edge over pie pan and press edges together with a fork. 


Slice about 6 slits in the middle of the pie and place in the oven for about 45-55 minutes. Check at 45 minutes and take pie out when edges are golden brown. 


Allow to cool for about 15 minutes, then serve! It's yummy with a scoop of frozen yogurt, or my unconventional favorite- Coconut Bliss. Now, off to decorate for Christmas!


Sunday, November 25, 2012

Pulled Pork & Swiss Chard Sliders

Happy Saturday, darlings!

These are EASY. Super easy, yet tasty and cute enough for a small dinner party we had last week. This is a short recipe post; fortunately it's basically impossible to mess up.


Ingredients:

1 Pork Shoulder, any lb. you like
2 tsp. sea salt
2 tsp. black pepper
2 tsp. cayenne pepper
1 clove garlic, chopped
1 c. barbecue sauce of your liking, I prefer Sweet Baby Ray's
4-5 stalks of swiss chard
1 tsp. garlic salt
2 tbsp. fine quality olive oil

Method:

Using your slow cooker, set on Low or High, cook your pork according to the size. I tend to use Google to search how long to cook it for, but generally I wind up cooking most sizes for 5-6 hours. You want the pork to be soft and easy to pull apart with two forks.

Place your pork in the slow cooker, then cut little slits on the top, and sprinkle your seasonings over it. Cover with barbecue sauce, and place the lid over it. Allow to cook according to directions.

Once your pork is done, cut about an inch of stem off the swiss chard and throw it in a large sauce pan with the garlic salt and olive oil. Allow to simmer and the swiss chard will cook way down. This usually takes about 10-15 minutes. Warm up your slider buns, scoop a little pork on it, and cover with swiss chard. That's it! I told you it was easy...


Thursday, November 22, 2012

Give Thanks


Pesto Kale Pasta

Just a quick post before Turkey Day! I made my Nigella Lawson's Rosemary Cake today, and can't wait to share it with you! Tonight I've been thinking about how thankful I am for everything I have. A simple phrase, but I feel it from the bottom of my little heart. Let us think about our gifts and blessings on Thanksgiving, as in every day!

The other night I whipped up a quick pasta dish with some kale we picked up. I also wanted to try and make a sauce from some whole tomatoes I picked up at Trader Joe's. Once they were seasoned with some garlic and Italian herbs, and the kale cooked down a bit, it was a lovely dish for a chilly, rainy, night.


Ingredients:


4 cups of fresh kale

2 cups of fresh spinach
4 whole cooked tomatoes, skin removed
1 lb. whole wheat pasta, any type
1/2 c. pesto
2 tbsp. olive oil
2 tsp. Italian seasoning: basil, oregano, parsley
1 tsp. garlic salt
Pecorino Romano grated cheese, to taste

Method:


In a large sauce pan, combine olive oil, tomatoes, spinach, and kale. Allow to saute for about 5 minutes, then add seasonings and continue to saute.  


Add tomatoes and let simmer for about 10-15 minutes, until kale and spinach cook down. Meanwhile, cook pasta according to directions.


Once pasta and vegetables are completely cooked, combine in large saucepan with pesto and mix well. Add grating cheese, if desired, and dish it up! A quick, nutritious, and filling dinner, all less in thirty minutes! Who can argue with that, my friends?


Happy Thanksgiving!

Tuesday, November 20, 2012

Healthy Conversions!

Good Morning!

As I was perusing the web this morning, I stumbled across this... What a great find, especially so close to the holidays! I know in my home we're trying to keep as healthy as possible, and while it's a perfect time to indulge at the holidays, we still like to feel like we're treating our bodies well! The more often we eat vegetables, organics, and non GMOs, the better!


I'll be back tomorrow, with my recipe for Nigella's Rosemary Bread... YUM!


Friday, November 16, 2012

reach


Around Town

Lately I've been inspired by the beauty my little neighborhood (in a big city) has to offer. From the docks to the old streets, I appreciate all the culture that has gone before me! Seattle is a wonderful place, please visit!


A Friend

While I usually don't write about too many personal things on here, I wanted to share something with my dear readers: a year ago, my husband and I adopted our precious, sweet black lab, Molly. We saved her from Animal Control, where they do, unfortunately, put down unwanted animals. Here's to many more years of companionship with our little darling! 

Hugs & Happy Friday!


Monday, November 12, 2012

Chocolate Avocado Pudding

I hope you all had a lovely weekend, and, if you are off today, are thinking about our Veterans. We can never thank them, pray for them, or think of them enough!

I made this easy, simple, and relatively healthy dessert a month or so ago, before we moved. It is so lovely and delicious, I promise you'll love it! While it is more suited to warmer weather, (at least I like warm food in the fall and winter), you could melt some chocolate instead of the cocoa powder, and that may warm things up!  I added homemade whipped cream, which of course, makes everything tastier.

Recipe, courtesy of This Chick Cooks.

Ingredients:

  • 1 avocado, soft and ripe
  • 1 teaspoon vanilla
  • 1/4 cup cocoa powder
  • 1/4 cup grade b maple syrup
  • 6 tablespoons milk (coconut, cow or any type of milk you prefer)
Method:
Cut avocado in half and remove pit. Scoop out flesh and put in in the blender along with remaining ingredients. Process until smooth, occasionally scraping down sides. Serve immediately or refrigerate until you're ready to serve.


Hope you're all thinking of Thanksgiving treats, I know I am!