Showing posts with label Memories. Show all posts

Thursday, December 27, 2012

Christmas Chocolate Tart

Now that Christmas is over, I'm believe I'll be heading in a tad bit healthier direction with my recipes...While my recipes wouldn't be described as "fatty" or unhealthy, I think I can step it up a bit in the nutrition department. That means: less carbohydrates, less white flour, and less refined sugar. It's a brave new world, and I'm jumping in! While this next recipe doesn't exactly jive with the whole paleo/green/crazyfit new me, it is simple, delicious, and you'll only want a sliver of this dark chocolate tart. Plus, my mother made it on Christmas, so it goes without saying that it'll be a hit.


If you look closely enough, you'll see Ben & Jerry's Greek Frozen Yogurt. If you think that Blueberry Graham Cracker Frozen Yogurt doesn't mix with chocolate tarts, you'd be wrong. 


Ingredients: 

crust- 
8oz. gingersnaps, finely crushed (Anna's brand is the best)
1/4 cup melted butter 

filling-
12oz. bittersweet or dark chocolate, chopped finely
1 cup whipping cream
1 egg and 2 yolks
1/2 cup sugar
1tsp.flour
pinch salt

Method:

Preheat oven to 325 degrees.   Crush the gingersnaps very finely, placing them in a plastic bag and rolling over them with a rolling pin does the trick. Next, add the melted butter and press crust mixture into greased tart pan, set aside. Combine chocolate and cream in saucepan and whisk on low heat until melted. Whisk egg yolks, egg, sugar, and flour in a separate bowl. Gradually whisk chocolate mix into egg mix and blend. Pour filling into crust. Bake 30 minutes until center is softly set. Allow to cool (if you can) and drizzle with some homemade caramel sauce (not diet friendly- but it's the holidays!!) I made this recipe here to go with my Christmas Eve Turtle Cheesecake. Now here's to good, healthy, resolutions and goals in 2013!


Monday, December 10, 2012

Healthy Holiday Snacking

Believe me, I know as well as anybody how tempting holiday treats can be. Just set foot in a Trader Joe's and you'll see Peppermint-Chocolate-Covered This and Hazelnut -White Chocolate Dipped That. It's hard, my friends, it's hard. However, when you are ever so tempted, just whip up some homemade cheez its and some  pear-apple sauce (made entirely of pears!) With our schedule getting a little tighter due to new jobs, attempting to run outside most days, Christmas shopping, and planning Christmas Eve dishes, we've been trying to be mindful of what we're putting in our bodies. These treats, although not made of quinoa and flaxseed, are free of artificial ingredients and colors. You may even find the ingredients in your pantry right now!


Although I'd like to take credit for this ingenious recipe, I borrowed these yummy, bite sized cheese snacks from A Chow Life, an amazing blog. These do not take very long to make and they'll keep you satisfied when you're running around, shopping, or picking out your Christmas tree.


Next, a perfect compliment for your snacking, pear (apple) sauce. I would just call it "pear sauce", but that sounds pretty strange and unappetizing. At least to me, so bear with me.


Ingredients:

3-4 soft Bosc pears, I'm sure you can use other varieties, but these are my favorite.
1 tbsp. cinnamon
3 tbsp. c. brown sugar
1 pinch of salt
1 tsp. nutmeg
1 tsp. ginger
1 tbsp. light corn syrup
2 tbsp. warm water

Method:

This recipe is so easy you could do it while poring over the awe inspiring Nigella Lawson book, How to Be a Domestic Goddess. I am so specific, because that is precisely what I was doing while making this pear sauce. 


Simply roughly cut up your pre-skinned pears and pile them in a large sauce pan, then add 2 tbsp. warm water. Bring to a simmer slowly, then add the remainder of your ingredients, in no particular order. You may want to use less brown sugar, since the pears are generally very sweet, but it's up to you. Cover pan and allow to simmer for about 15 minutes, checking frequently. Then bring heat down to a low and let sit covered for about 30 minutes.

Let cool before serving, burned tongues would not be fun. Serve to your loved ones, or have it in front of a crackling fire. Either way, know that something warm, healthy, and delicious is about to nourish your holiday addled mind!

Monday, November 26, 2012

Clean Eating: Mom's Apple Pie


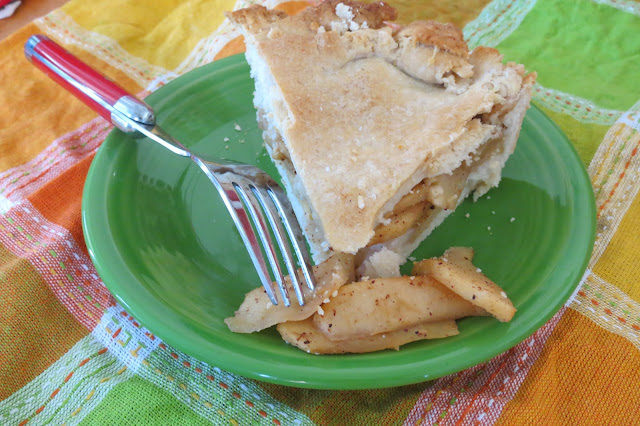
For years now I've enjoyed my Mom's Apple Pie. The crust: flaky, thick, and warm. The apples: spicy and naturally sweet. Last night I had a strong hankering for this pie and decided to whip it up in my own kitchen.


I have so many memories of slicing the apples, sprinkling them with cinnamon, nutmeg, ginger, and allspice, and then being unable to resist eating them straight out of the mixing bowl. The nice thing about this pie is that it contains no butter, no sugar, and nothing artificial. That's right, no sugar. The sweetness of your apples should do the trick. 


And while it's no Martha Stewart apple pie, it certainly is better for your waistline. I am happy to say that with the Clean Eating rage, it's nice to know that my mother had been feeding us "clean" apple pie for our whole lives! Way ahead of our time. 


Ingredients:
2 2/3 cups  flour
3/4 cup vegetable oil or 3/4 cup canola oil
4 tablespoons cold water
4-5 medium sized Pink Lady or Gala apples; or 3-4 large apples; sliced thinly
1 tbsp. cinnamon
1 tsp. nutmeg
1 tsp. allspice
1 tsp. ground ginger


Method: adapted from Mom's crust recipe and Food.com

Measure flour and salt into bowl. Add oil; mix with a fork, until particles are the size of small peas. Sprinkle with water, 1 tablespoon at a time, until flour is moistened and dough almost cleans the sides of the bowl. 


Depending on whether your dough seems to dry or wet, add either a tbsp. of oil or flour. Pick dough up and ball it together into one pressed ball.  Work the dough in your hands to make it a bit less crumbly.

Break dough in half and similar to rolling pizza dough, press it flat between two sheets of wax paper. Roll out into the general circumference and shape of your pie pan. Gently peel off one sheet of wax paper and turn dough upside down. Peel off remaining sheet of wax paper after placing bottom crust into pan leaving a 1/2 inch overlap around pan edge. Follow the above steps with top crust rolling out same as bottom crust leaving 1 inch overhang around pan edge). Fold and roll top edge over pie pan and press edges together with a fork.


Once your apples are sliced, throw them in a large mixing bowl. Add spices and stir well. Allow apples to sit at room temperature for about 3 hours, to macerate in their own juices.  Pour  apples into crust, then fold the pie dough for the top over pie pan, roll top edge over pie pan and press edges together with a fork. 


Slice about 6 slits in the middle of the pie and place in the oven for about 45-55 minutes. Check at 45 minutes and take pie out when edges are golden brown. 


Allow to cool for about 15 minutes, then serve! It's yummy with a scoop of frozen yogurt, or my unconventional favorite- Coconut Bliss. Now, off to decorate for Christmas!


Friday, November 9, 2012

Happy Friday & Whiskey Apple Cider

Happy Friday everyone!

We're headed Over the Mountains and Through the Woods to my baby nephew's First Birthday Extravaganza! I can't wait... and I'm making this and these. Whooppee! Is there anything better than a First Birthday Party? Other then, well, your wedding day ;)


*Courtesy of CreateLive Recipe!

Sunday, September 23, 2012

Lightened Up Pasta Carbonara


Pasta alla carbonara was always a dish that I had heard about, yet never researched. However, when we went to Italy, the land of carbohydrates, olive oil, thick crusty bread, and, pasta, we had pasta carbonara more than once. It would be served in large bowls, sitting in a small pool of the tastiest olive oil we'd ever tasted. 

Followed up by a scoop or two of gelato and a stroll along the boulevards bustling with mopeds and Fiats, pasta carbonara is the perfect taste of Italy, and, in my opinion, the perfect taste of Summer. 

Unfortunately, the dish can be very heavy; if you don't be careful, you'll definitely be feeling the rich prosciutto, heavy cream, and egg mixture the next morning.

 I've made the original version and it is without a doubt, one of the most delicious experiences I've had. Making a true pasta carbonara will inevitably a) restore your faith in humanity, b) restore your faith in your own cooking ability, and c) make you want to take a nap.

In a effort to cut down on our cholesterol intake, I whipped up this lighter version. I would absolutely recommend trying out the original version first, it's hard not to want a pool sized bowl of it to dive headfirst into. If creating healthier versions of a traditional Italian meal sounds appealing to you, then give this a try. Mangia!

Ingredients:

1 package of large slices of prosciutto
2 cloves of garlic
3 tbsp. olive oil
1 tsp. sea salt
1 lb. whole wheat thin spaghetti
1/2 c. grated parmigiano reggiano cheese
1 tbsp. parsley
2 eggs

Method:

Boil water and cook pasta according to directions. 


Slice garlic and prosciutto.


Add your prosciutto, rough cut into small chunks. Allow prosciutto, garlic, and olive oil to meld together, on a low heat. 

In a small bowl, whisk together the 1/2 c. grated parmigiano and the 2 eggs. Set aside. Once pasta is ready, drain in a colander, reserving 1/4 c. water. Combine pasta and all ingredients, including eggs and cheese in a large pot or bowl, and stir for about 1-2 minutes, making sure the pasta is thoroughly coated. 


Sprinkle with parsley and you have a filling and scrumptious supper looking right at you!

Thursday, September 20, 2012

Walla Walla

A few pics from our recent trip to Walla Walla... we walked til our legs were worn out, ate European style platters, and took in the sights in this beautiful town. Walla Walla is home to all sorts of fanciful boutiques, quaint restaurants, and a bountiful farmers' market.


A cute puppy dog statue.


Downtown


A mid-afternoon refresher at Salumiere Cesario.


 I ordered the Ploughman's Platter; a mini baguette, spicy mustard spread, fine cheese, meat, and roasted almonds. 


And, husband ordered the Lunchbox Special, which included figs, roasted nuts, and fruit!


Here is Sweet Basil Pizzeria, a favorite of my father's. He's been known to purchase growlers there. If you don't know what a growler is, research it. 

We came here for lunch about a year ago on our first trip to Walla Walla, and loved it's trendy interior and plethora of New York pizzas and fresh salads.


After more walking, we drove through the campus of Whitman College. It reminded me a little of where we went to college; old brick buildings brimming with history, and long tree lined streets. For a moment I longed for new notebooks, brainy professors, and studying in the quad. 


If you haven't been to Walla Walla, please visit. You won't be disappointed in the sweet town. Also, if you are a wine lover, you can't find a better place to spend a relaxing weekend. Wineries are plentiful on either side of Walla Walla. Now, that would be a great future post...


Hugs,

k

Saturday, September 8, 2012

Delancey & Essex

I've talked about my obsession with Ballard, pizza, good food, and the blog Orangette before. And coincidentally, I am reading A Homemade Life, and loving it so much. But, a few weekends ago, we were lucky enough to have a quick trip to Seattle before a family Labor Day get together. And...we went to Delancey. We got to meet up with my very dear friend Sarah, who I keep around mostly in case I get into trouble and I need an attorney to back me up. Really, it's true. I have some pretty cool friends, and like I tell her, she's one of the Top 5 Coolest Friends of mine. In addition, she has been known to make certain people delicious carrot cake for their birthdays, too.

 This is a rather old picture of Sarah and I. Technically she was my "boss" when this picture was taken, but believe me, our friendship runs much deeper than our love for legal research.

Anyways, it just so happens that even though she assists with cooking classes at The Pantry, next door to Delancey, Sarah and her boyfriend, had only experienced Delancey pizza one other time! Since they are such fabulous and supportive friends, they satisfied our (okay, my) burning desire to check out the restaurant and the new bar, Essex, that just opened. That's right, we went to a buzzed about bar shortly after it just opened its doors. And, it was featured in the Seattle Times. So we put on our party hats and headed out to Ballard, our old stomping grounds. Luckily, we had an hour wait ahead of us at Delancey, so we headed over to Essex. And wow, was it neat. The cocktail list was concise, but complex. I ordered a cocktail carefully crafted with elderflower and herbs and Sarah tried a light breezy citrus beverage. Our significant others ordered cocktails too, but clearly I was too enamored with mine to remember what they were.


Mine is the pink one with pretty flowers floating in it! Tres chic!

An hour later, we continued on to pizza...


Delicious, just delicious. The environment is simple, yet very Seattle-y, with local art and photography lining the white walls. To be honest, I did not get a lot of pictures of our pizza, because I was too busy consuming it. Pictured above is the bacon onion, a magical combination of pure flavor explosions. We additionally ordered (and finished) a pepperoni, a white pizza, and a mozzarella.

All in all, a wonderful night full of good drink, good friends, and good food. A girl can honestly ask for nothing more. Go visit Delancey, and have a night you won't forget.

Ciao,

k

Monday, September 3, 2012

Upside Down Peach Rhubarb Pie

It was somebody special's Half Birthday last week! (Hint: somebody very special to me) After a tasty meal of chicken sliders, I whipped up my very own recipe for an upside down pie. Now, I have only made one other upside down peach pie, about a year ago. They're delicious.


Believe me, there's something very special about eating your fruit from the top, instead of being forced to eat it from the bottom, or worst of all, stirring it, a la yogurt with that icky syrupy fruit. Anyways, I had seen a quick recipe for sour cream muffins some time ago, and I knew I had some of that in the fridge. Just add some butter, eggs, sugar, and vanilla, and I've got a crust! So here we go, let's recreate this tasty Half Birthday Pie.

Ingredients

for the crust:

1.5 c. white flour, preferably sifted
1 tsp. baking soda
1/4 tsp. sea salt
2 tsp. vanilla extract
1/3 c. sour cream
1 egg
1/3 c. granulated sugar
1/3 c. butter, room temperature

for the fruit:

1 tsp. butter, melted for the pan
2 sliced peaches, skin removed
2 long stalks rhubarb, sliced very thinly
1/4 c. granulated sugar
1 tbsp. honey

Heat your medium sized skillet to medium-low heat and throw the fruit, sugar, and honey all in with the melted butter. Let the fruit sit, bringing to a boil. Lower the heat to low, and allow fruit to simmer while you mix up the topping/crust, about 15-20 minutes.

*Note, because your skillet will be going in the oven, make sure it is able to bake in the oven. Most brands are capable of this, especially Cuisinart and All Clad.

Preheat oven to 375 degrees. With a stand or hand mixer, whip the sugar, butter, vanilla extract, and eggs until creamy. In a separate bowl, whisk together flour, baking soda, salt. Add the dry ingredients to the wet, taking breaks to mix. Be sure to include the remaining dough that sneaks up the side of the bowl!

Once the dough is finished, bring the bowl over to your stove top and carefully spoon the dough over the fruit in dollops. Smooth the topping over the fruit and when you're satisfied pop it in the oven for about 45 minutes.

Continue to keep and eye on your upside down pie, and when it looks like it is turning golden brown on the edges, check with a toothpick or fork. Once it seems done, remove from the oven and let cool for about 15 minutes.


Now, here comes the tricky part. However, the good news is that it's really not all that tricky. You may need to grab an idle body to come help, but believe me, you can do it yourself too. So what you'll need to do is place a large circular platter on top of the skillet, but make sure you have enough room to hold both the platter or plate and your skillet with both hands. Next, run a knife around the inside of the skillet, loosening up the crust. Now, flip the whole thing upside down and lift up your skillet (which should now be empty).


Voila! A glorious, beautiful, fruit-on-top treat for you and your loved one. Enjoy with a scoop of vanilla bean ice cream.

Monday, August 20, 2012

Ice Cream & Waffles


It’s this simple: slice up some ice cream (for once, not frozen yogurt!), make some waffles, add some chocolate chips sprinkled in, and enjoy. Pure, unadulterated summer sweetness. You have the mixture of cold, rich ice cream with the crunch of a homemade Belgian Waffle. It really is perfection.
My dear, sweet, mother inspired this dessert. She told me the other day that when she was a young girl, living in NYC, she told me that on her way home from Jones Beach, in the sweltering heat, her father would take her and her assortment of Irish cousins to Woolworth’s for the favorite summer treat.
“They’d slice a thick, cold, slice of that vanilla, chocolate, and strawberry ice cream, and lay it in between two square waffles”, she said. My mind wandered to a hot, humid, New York day, one of those days that requires two showers. My mom, about 11 years old, is trudging down the sidewalk, licking the strawberry ice cream off her fingers. Actually, wait, my mother would never lick her fingers. She’d use a napkin. Anyways, she’d wipe her fingers off delicately on a Woolworth’s napkin.
After it was all gone, just a distant memory in her full stomach, she’d sit on the subway, dreaming of the next weekend. Next weekend, she’d swim in the surf, build sandcastles with her family, and eat turkey sandwiches out of the cooler. Next weekend the glory that is Summer in New York would begin again.


That was pretty cute and I had no idea that you would do this. I loved every bit of it!