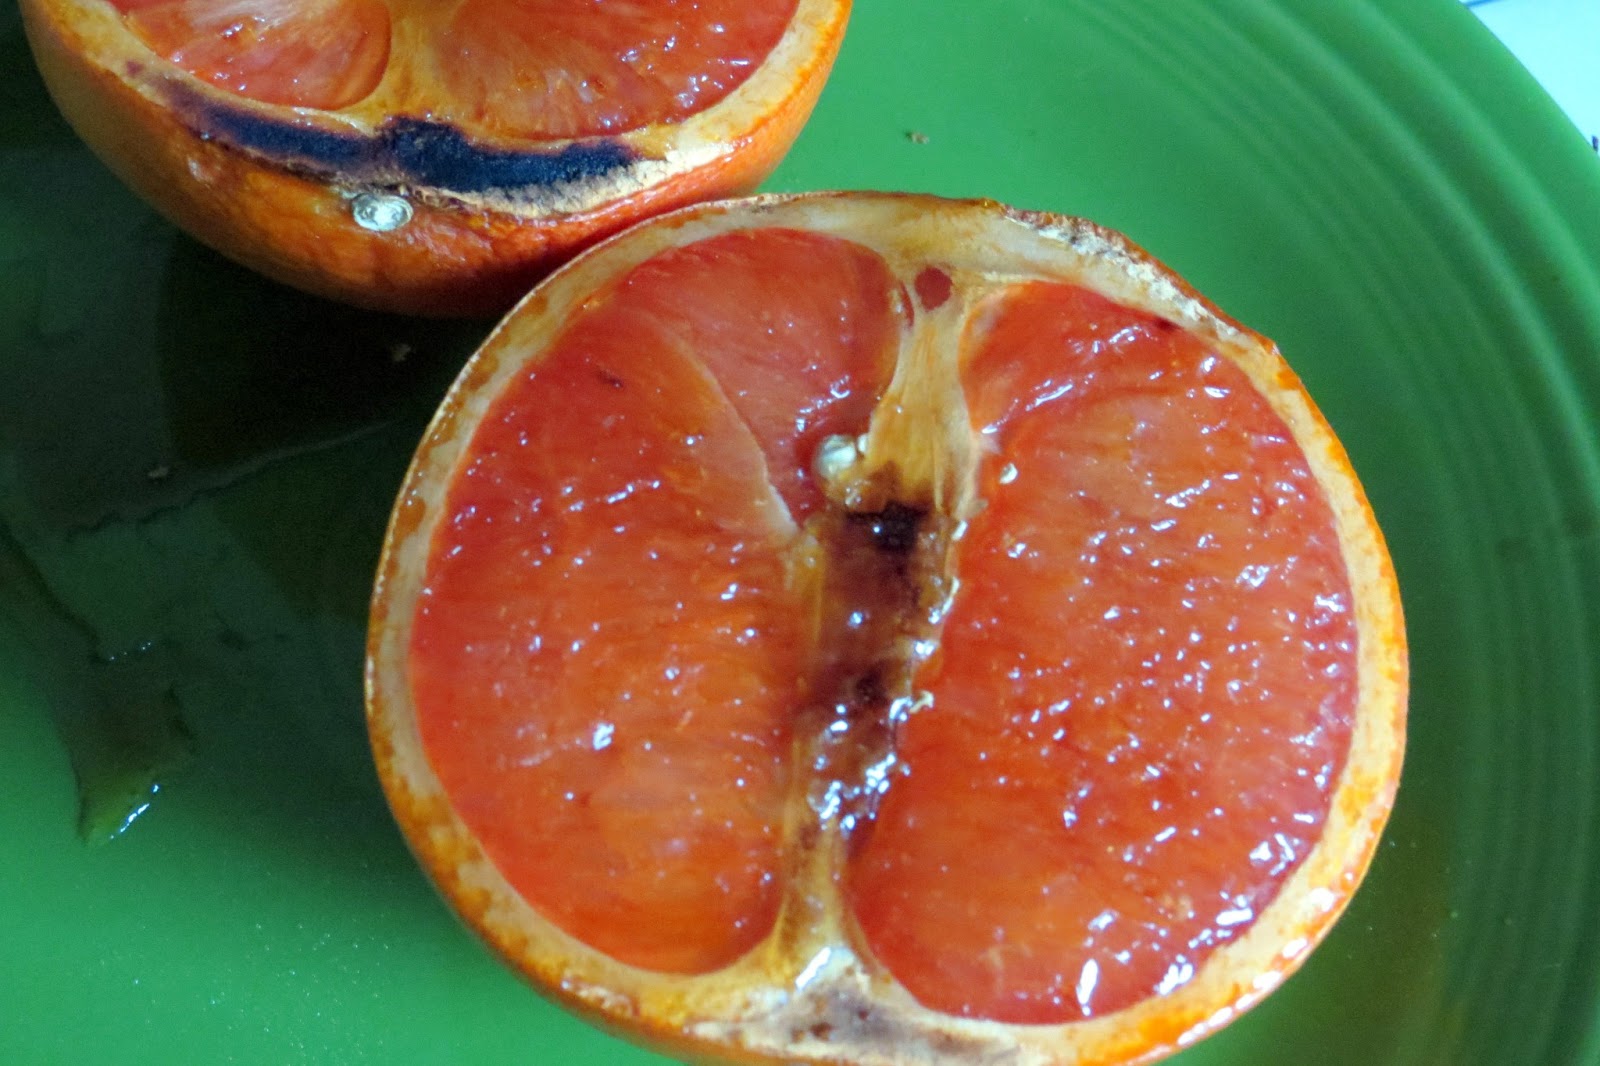
Showing posts with label Snacks. Show all posts

Wednesday, February 27, 2013

Comfort Food

The other day, I was feeling run down and tired. I knew I needed a boost of vitamins, and fast. I quickly roasted a sweet potato and then broiled a grapefruit. The result was a flood of vitamins A and C, pectin, and lycopenes. If you're feeling run down, just grab your nearest vegetable or fruit, add some sugar, spice, or salt and you'll have a satisfying, healthy treat. These two snacks are my new comfort foods, good for a chilly, rainy, Seattle day.

Broiled Grapefruit


I recently stumbled upon this beautiful blog post  from Gimme Some Oven and was quite inspired. I was not disappointed. I think next time I will add some cinnamon and sugar, as in this recipe, so as to add a little more flavor. All in all a wonderful idea and quick too!

Ingredients:

1 large ruby red grapefruit
1-3 tsp. brown sugar
Optional: 1 tsp. ginger or 1 tsp. cinnamon


Method:

Slice your grapefruit in half and cover with sugar and spices. Broil fruit about 2 inches from the heat. Cook for about 10 minutes or until the edges turn brown, your sugar sizzles, and you can't stand the smell any longer!


Roasted Sweet Potato

For my birthday, a dear friend gave my husband and I some black truffle oil, specialty sea salt, and vanilla salt from Sugarpill, an apothecary in Seattle. Delighted and excited to try all these treats, I sprinkled the coarse salt on my roasted sweet potato. Combined with the creamy Kerrygold Irish butter (hey, I'm half Irish), it was perfect. There is nothing like a roasted sweet potato with just a teaspoon of butter and salt. To me, it tastes like sitting in front of the fire, or waking up warm on a sunny Saturday morning in April. If this sounds too dramatic for you, just try it.


Ingredients (makes one serving):

1 large sweet potato
1 tsp. butter
1 tsp. coarse sea salt

Method:

Preheat your oven to 350 degrees. In an oven safe bowl or on a baking sheet, place your sweet potato and puncture with a few holes to release the heat. Roast for about 40-60 minutes until soft and the skin is crinkly. Slice open and cover with sea salt and butter. And last but not least, enjoy! 


Tuesday, January 22, 2013

DIY Clif Bars

I have been eating Clif, Lara, Raw, and pretty much any kind of healthy date based bars for quite some time. If you're also a fan, you'd know that the soft nutritious goodness that you enjoy with the first bite and lasts through the entire snack. These days, a Clif Bar or Larabar may cost you up to a $1.25 a piece and while I wish I could tell you I calculated the money I've saved down to the homemade bar, I can tell you that they're worth every penny. My 8 x 8 pan made about 6-8 bars, but they lasted about one and a half days. They are great for breakfast, pre-workout snacking, post workout snacking, and anything in between.


Ingredients:

2 cups diced medjool (pitted) dates
1/2 c. dark chocolate chips
1/2 c. peanut butter
1/4 c. crushed pecans


Method:

Cover your 8 x 8 pan with a piece of parchment paper, leaving about 3" on each side. Next cut your thinly diced dates and peanut butter in your Kitchenaid or food processor on medium to high speed in order to thoroughly combine them with the peanut butter. Add chocolate chips and spoon into your 8 x 8 pan, then press with your hands into all corners. Cover with the remaining parchment paper and leave in the refrigerator for at least three hours. Slice and enjoy!


Monday, December 10, 2012

Healthy Holiday Snacking

Believe me, I know as well as anybody how tempting holiday treats can be. Just set foot in a Trader Joe's and you'll see Peppermint-Chocolate-Covered This and Hazelnut -White Chocolate Dipped That. It's hard, my friends, it's hard. However, when you are ever so tempted, just whip up some homemade cheez its and some  pear-apple sauce (made entirely of pears!) With our schedule getting a little tighter due to new jobs, attempting to run outside most days, Christmas shopping, and planning Christmas Eve dishes, we've been trying to be mindful of what we're putting in our bodies. These treats, although not made of quinoa and flaxseed, are free of artificial ingredients and colors. You may even find the ingredients in your pantry right now!


Although I'd like to take credit for this ingenious recipe, I borrowed these yummy, bite sized cheese snacks from A Chow Life, an amazing blog. These do not take very long to make and they'll keep you satisfied when you're running around, shopping, or picking out your Christmas tree.


Next, a perfect compliment for your snacking, pear (apple) sauce. I would just call it "pear sauce", but that sounds pretty strange and unappetizing. At least to me, so bear with me.


Ingredients:

3-4 soft Bosc pears, I'm sure you can use other varieties, but these are my favorite.
1 tbsp. cinnamon
3 tbsp. c. brown sugar
1 pinch of salt
1 tsp. nutmeg
1 tsp. ginger
1 tbsp. light corn syrup
2 tbsp. warm water

Method:

This recipe is so easy you could do it while poring over the awe inspiring Nigella Lawson book, How to Be a Domestic Goddess. I am so specific, because that is precisely what I was doing while making this pear sauce. 


Simply roughly cut up your pre-skinned pears and pile them in a large sauce pan, then add 2 tbsp. warm water. Bring to a simmer slowly, then add the remainder of your ingredients, in no particular order. You may want to use less brown sugar, since the pears are generally very sweet, but it's up to you. Cover pan and allow to simmer for about 15 minutes, checking frequently. Then bring heat down to a low and let sit covered for about 30 minutes.

Let cool before serving, burned tongues would not be fun. Serve to your loved ones, or have it in front of a crackling fire. Either way, know that something warm, healthy, and delicious is about to nourish your holiday addled mind!

Wednesday, August 22, 2012

Stuffed Yellow Tomatoes & Purple Peppers

Remember when I said I bought some beautiful yellow tomatoes and peppers from the farmer's market? Well, I finally did something with them... I stuffed them! Stuffing is a skill I've been working on a little; what do you do with a boring old chicken breast? You stuff it! With cheese, prosciutto, spinach, or whatever! You can find some really interesting recipes online, as stuffing is a popular way to create a delicious and simple entree.


I was alone in the kitchen last Sunday afternoon, wondering what to do with myself. We had just gone to a matinee in 104 degree weather, I had already gone swimming that morning and went to the gym as well. Usually I like to experiment in the kitchen, especially when I have an unlimited amount of time to do so. But, I was making a dessert to bring to work as well, and was trying to defrost a rather stubborn package of chicken breast (we made sliders!).


Anyways, I found a simple and succinct recipe from Giada. Her stuffed tomatoes are a little different than what I created, but hey, who says I have to follow the recipe anyways?


I think my favorite part about the vegetables is their bright, vibrant colors, and the subtle and summery flavors that melt in your mouth.


Cook these up when you are on a tight schedule, or when you're lounging around the house on the weekend. They are so tasty, especially with a little bruschetta on the side, or some nicely marinated chicken your husband whipped up.


Ingredients:

4-5 medium sized tomatoes, 2 large bell peppers, or both

1 tbsp. Italian seasoning (parsley, basil, oregano) or fresh herbs

1 tsp. garlic pepper

  • 1 garlic clove, finely chopped
  • 1/4 c. Italian style bread crumbs
  • 1/2 c. panko bread crumbs
  • 1 cup grated mozzarella or provolone cheese
  • 1/4 teaspoon freshly ground black pepper
  • 1 teaspoon butter, softened
  • 2 tablespoons extra-virgin olive oil
Method:

Pre-heat oven to 375 degrees

Butter a 9x13 pie pan. Cut the tomatoes in half, horizontally. Use a small spoon to gently hollow out the inside of the tomatoes, getting rid of the seeds and saving the pulp. Roughly chop the saved pulp and put in a medium bowl. Add the dried or fresh herbs, both types of bread crumbs, cheese, pepper and olive oil.

Scoop mixture into tomatoes or peppers (or both!) and fill to the top. Press down lightly, but firmly to make sure the vegetable is full but not overflowing. Drizzle with about a tbsp. of olive oil. Bake for about 25 minutes until they look cooked and the bread crumbs appear toasted.


Mangia!

-K

Monday, August 20, 2012

Fourth of July, Desert Style

…yes, that’s “desert”, not “dessert”!

Well, I know you were all so very anxiously awaiting this post. I know that you were laying awake, staring at the ceiling, wondering “what in the heck did that little blogger make for the Fourth of July?” Did she go classic hamburgers & beer? Did she make cupcakes? What. Did. She. Make??

Well, my friends, the answer is, she made a completely self made recipe of bean, pepper, and and mushroom pizza squares. *Sounds weird, I know. And, because I am patriotic, not because I am obsessed with blueberries*, made a blueberry cheesecake.

My sweet husband and I were graciously invited to my friend’s house, allowing us not only to eat and drink until we felt like napping, but to have a simply wonderful time out in the desert sunshine.
Some of you may know my very dear friend, who blogs over at Sippy Cups and Prada. Her blog is growing in popularity, and is very inspiring, as the woman has two children, a husband, two dogs, and a very steady, meaningful job at my office. Needless to say, I’m impressed. And the important thing is that she looks good doing it!

As for the barbeque, we had grilled salmon, ribs, deviled eggs, homemade tortillas (which she has blogged about, people!), mango salsa, not to mention beer, and a very strong, slushy, pink drink, thaat apparently had a lot of champagne and sugar in it. Oh yeah, and they were in mason jars, so obviously that makes everything a bit more trendy!

On a sidenote, I am not sure if the husband, myself, and our pup, Molly may get invited back again, as Molly promptly “fell” into their pool, and caused quite a ruckus. She’s been known to cause a scene at barbeques before. Anyways, on to the food; there’s my cheesecake and pizza squares on the right!


…delicious mango salsa.


…and ribs.


There’s Husband, slicing into the delicious ribs. He’s clearly being hilarious.


Here we are, having a stimulating conversation!


My darling friend, Y.


And, here are the slushies!


Now, on to my pizza squares.

1 pre-made pizza crust dough, or home-made. I prefer whole wheat dough when cooking the dough on the pizza stone, it turns out nice and crispy.
½ can of non-fat, vegetarian, organic refried beans (there is such a thing!)
1 c. shredded sharp cheddar cheese
½ c. of black beans
½ c.  finely chopped red, orange, or yellow pepper, but definitely not green, ick.
¼ c. sliced mushrooms
¼ c. sliced olives
1 small handful of cilantro, chopped

Pre-heat oven to 375 degrees. The assembly of ingredients is just like a regular homemade pizza, however, I like to bake the raw dough on the pizza stone for about 5 minutes so that it won’t turn out mushy and fall apart in your hand, not that it’s happened to me!

Spread the refried beans on the crust just as you would marinara sauce on a cheese pizza. Top with ½ the cheese and sprinkle with black beans, peppers, olives, and mushrooms. Bake for about 15-20 minutes, or until the crust turns golden at the edges. Let cool for about a minute and sprinkle with the cilantro.

I think you will love this dish; it’s tasty, simple, and best of all, husband approved!

Ciao,
K

2 thoughts on “Fourth of July, Desert Style”

  1. I really like the writing, so expressive and detailed! This looks like a true feast, I bet all of you needed to take a nap afterwards. A happy day for sure. The cheesecake looks professional!

Cranberry Coconut Peanut Butter Bars


If it’s one thing I learned from all our childhood road trips, it is to bring snacks. While a simple enough idea, you have no clue how badly you need said snack until you’re stuck : a.in traffic, b.on a mountain pass. That’s all you need to know, dear readers. And because I’m not feeling particularly witty, getting up at 5:30 will do that to you, here goes my very original, granola bar recipe. I hope you will enjoy them, and I hope they will prevent you from eating that cracker you find in your glove compartment.

Ingredients:
1/2 c. whole wheat flour
1 c. whole oats
3 tbsp. natural peanut butter
2 tbsp. honey
3/4 c. dried cranberries
1/4 tsp. sea salt
2 tbsp. wheat germ
1 tsp. vanilla extract
1/4 c. non-fat or soy milk
1 c. unsweetened coconut
Optional: 1/2 c. chocolate chips or cocoa nibs

Mix peanut butter, wheat germ, flour, oats, and salt in a stand mixer on medium high. Pour in cranberries, coconut, and vanilla extract. Depending on how moist your dough is, you may not need the full amount of milk. You want the dough to stick, but not be sticky, if that makes sense!

Image

Spread in a 9×13 pan, and bake at 350 for 15 minutes, long enough for the edges to become golden brown.

Image

Don’t be surprised if your energy, work ethic, and general attitude improve!


4 thoughts on “Cranberry Coconut Peanut butter Bars

  1. I find this particular blog post quite witty. My general attitude has improved upon simply reading this delightful recipe.
  2. I love this recipe and I will try them! I like your wisdom and hints; I can tell that you are a great baker!! I also like the new photos of the countryside and I hope that the following grows.